The short answer
Turf is usually held down by 6-inch steel spikes driven through the lawn — and spikes are the weak point: each is a single point load that works loose as turf expands and contracts with temperature, until edges lift and wrinkles appear. A poured concrete border, with the turf glued along the whole perimeter, removes the moving parts.
The short version
| Steel spikes | Poured concrete border + glue | |
|---|---|---|
| How it holds | Dozens of individual spikes driven through the turf into the ground | A continuous 3×3×3-inch concrete border around the perimeter; turf glued to the border along its whole length |
| How it fails | Each spike is a point load and a rust/wobble point; thermal cycling and foot traffic work them loose one by one | No fasteners through the turf to work loose; edge stress is distributed along the whole border instead of concentrated at points |
| What failure looks like | Edges lifting, wrinkles that come and go with the time of day, whole panels creeping off their lines | The perimeter stays where it was built; the repair-bench failures above are the ones that stop showing up |
| What the repair looks like | Re-driving spikes into ground that already let them go | Rebuild the edge once, as a border, and glue it |
| Cost | Cheaper and faster — that's why it's the default | Costs more: edging, a concrete pour, and glue are extra material and labor on every job |
How are most lawns held down?
The industry default is the 6-inch steel spike: panels are laid, and spikes are driven through the turf around the edges and throughout the lawn to pin it to the ground. It's fast, it's cheap, and it's what you'll get from most installers unless you ask. Ask — because the fastening method is the part of your install most likely to decide whether you're calling someone back in year two.
What's under the turf matters too: a proper Florida install starts with a screening-sand base — the same sand paver crews here bed driveways on — dug out 2–3 inches below the sod line, never built on topsoil, wetted and compacted in lifts to a minimum of 95% Standard Proctor (ASTM D698), the Synthetic Turf Council's guideline for base compaction, and screeded smooth: firm enough to hold its grade, on a base built to stay free-draining, because drainage and flatness are decided there, before any turf is unrolled. (The crushed gravel homeowners read about online is generic national advice. In Florida it enters the picture only when a yard needs feet of vertical fill — and even then, screening sand caps it.)
Why do spikes let go?
Turf is not dimensionally still. It expands in heat and contracts in cool — every day, and across every season. A spike holds the turf at exactly one point, and every expansion cycle pushes against that point; foot traffic works it from the other direction. Over months of thermal cycling, spikes loosen in their holes. Each one is also a rust point and a wobble point waiting its turn.
The failure rarely announces itself as "a spike came out." It shows up as the symptoms in the next section — which is why spiked installs so often get diagnosed as three separate problems instead of one perimeter problem.
What does a glued concrete border do differently?
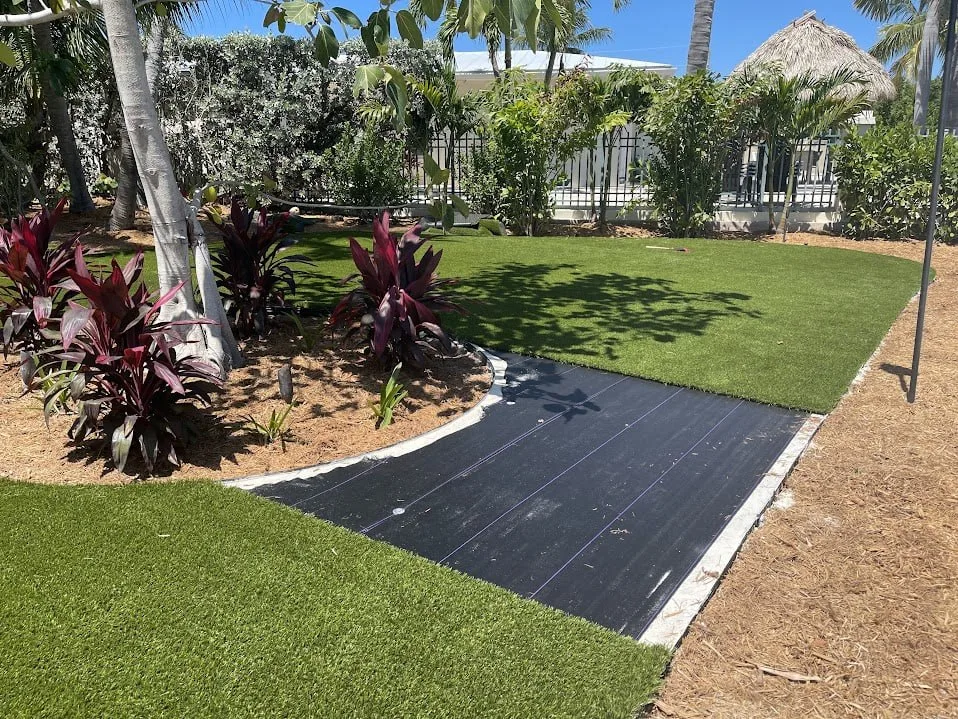
The border method replaces point fastening with continuous fastening. The build, in order:
- The install is outlined with 6-inch metal or plastic edging.
- A 3×3×3-inch concrete border is poured along the inside perimeter, butted against the edging.
- A woven weed barrier goes over everything.
- The turf is laid and glued to the concrete border with turf glue that carries a 15-year warranty.
The barrier in step 3 is woven, and that's a deliberate choice: a woven fabric's interlaced construction carries far more tensile strength than pressed (nonwoven) sheet fabric, so it goes down intact, stays intact under the work, and keeps blocking growth from below for the life of the turf. A pressed sheet that tears while it's being spread isn't protecting anything — the barrier only earns its place in the build if it survives the build.
The structural difference is one sentence: a glued continuous perimeter distributes edge stress along the whole border and removes the moving part. There's no fastener to loosen because the fastener is the entire edge. As a side benefit, there are also no steel spikes in the lawn to work loose underfoot — the safety point matters in bare feet and around paws.
What actually fails first on a spiked install?
From the repair bench, the spike-perimeter failures have a recognizable set of faces:
- Edges lifting at borders and planters — spikes pulled out, sometimes with the base washed out beneath them. The fix is to rebuild the edge with the border-and-glue method and fix the water source, not to add more spikes.
- Wrinkles and ripples that come and go with the time of day — thermal expansion pushing against a perimeter that has crept loose. They worsen at midday, when the turf is at its biggest. The fix is to re-stretch, re-secure the perimeter properly, and top up the infill.
- The whole panel "crawling" — a panel that has shifted off its layout lines, because nothing continuous was restraining it against thermal cycling. The fix is to re-set the panel and glue the perimeter.
Notice the pattern: on a spiked install, the perimeter is the first thing to go, and everything the homeowner sees — the lift, the wrinkle, the shift — is the perimeter letting go. Wrinkles and edge lift after the first summer are among the most common complaints in this business, and they trace back to exactly this.
What holds the middle of the lawn down?
Not the border — the border's job is the perimeter. The field of the lawn is held by weight and by its seams: infill is applied (1.5 to 2 pounds per square foot is our standard) and power-broomed in, and that ballast is a real structural part of the system, not just cosmetic. Seams between panels are joined on seam tape with a full spread of adhesive. A lawn is a system — perimeter, seams, and ballast — and the spike method shortchanges the most stressed of the three.
Florida note
Southwest Florida is hard on fasteners. Our soil is sand, and in the rainy season it's saturated sand: a spike's grip is only ever as good as the wet ground around it. A glued edge is bonded to concrete, not to soil conditions. Florida heat also runs the expansion-contraction cycle harder than almost anywhere — it's why the wrinkle complaint here has a time-of-day pattern, worst at midday. And the construction logic cuts the same way in storms: a glued continuous perimeter plus full infill ballast is a materially better wind-uplift build than spikes in saturated sand. That's construction reasoning, not a promise — no honest installer warranties against hurricanes.
The honest downside The border method costs more — openly. Edging, a concrete pour, and glue are extra steps, extra material, and extra labor on every job, and it's one of the reasons a border-method install runs higher than a spike-down competitor's quote. It's also a bigger commitment: the border is poured concrete, so if an edge is ever damaged, the repair is rebuilding that border section, not hammering in a fresh spike. And glue is not magic — adhesive applied to wet backing, or spread thin to save money, doesn't bond, on a perimeter any more than on a seam. The method only pays if it's executed properly, which is exactly why you should ask whoever installs yours to walk you through how they do it.
The gotcha Here's what doesn't make the sales pitch: a spiked perimeter has dozens of individual failure points, and the installer knows most homeowners will never connect the year-two symptoms — the lifted edge, the noon wrinkles — back to the fasteners. When you compare quotes, ask one question: "What holds my edges down in year five, and what does it look like when it starts to fail?" If the answer is spikes, you're looking at the cheapest line item in the quote and the most expensive one over the lawn's life.
How AJ Turf handles this
It's the core of the AJ Method: the screening-sand base is compacted in lifts to a minimum of 95% Standard Proctor (ASTM D698) — the Synthetic Turf Council's base-compaction guideline, adopted as AJ Turf's written spec — then 6-inch edging outlines the install, a 3×3×3-inch concrete border is poured along the inside of it, a woven weed barrier goes over everything, and the turf is glued to the border with 15-year-warrantied turf glue. No spikes through the turf — not at the edges, not anywhere in the lawn. Underneath, where nobody walks, the barrier and the seam tape are pinned down with nails, exactly as they should be; what we refuse to do is fasten the lawn itself with point loads. It's how every AJ Turf install is built, and it's also the repair we perform on other installers' lifting edges: rebuild the edge as a border and glue it, once.
Questions people ask.
Are spikes ever acceptable?
They're the industry default because they're fast and cheap, and plenty of spiked lawns look fine on install day. The problem is the clock: thermal cycling and traffic work point fasteners loose over time, and the failures — edge lift, wrinkles, panel shift — are the most common repair calls in this business. You're not choosing between works and doesn't-work; you're choosing what year five looks like.
Can a spiked install be converted to a glued border later?
Yes — it's a standard repair. The edge is rebuilt: a border is built along the perimeter and the turf is glued to it, instead of re-spiking ground that already let go. Panels that have crawled get re-set on their lines in the same visit. AJ Turf assesses repairs free on site, with no minimum job size.
How long does the glue hold?
The turf glue used in the AJ Method carries a 15-year warranty. The point of the method is that the bond is continuous — the whole edge is the fastener — rather than a row of individual spikes each aging on its own schedule.
If there's a concrete border, what keeps the seams from opening?
Seams are a separate system from the perimeter: panels are joined on seam tape with a full spread of adhesive, then weighted for the full cure window. Most seam failures trace back to glue applied to wet backing, no curing pressure, or starved adhesive — all install-day shortcuts, and all avoidable. More on how seams are built and why they fail.
Updated 2026-10-13